导语
最近在看 React 源码,我是从 babel 转义后生成的 createElement 函数和 render 函数开始读起,然后发现这实在是太难看懂了,没有对 React 一个整体的把握,而是一个函数一个函数跳着看,这样可以大概看懂,但是却难以感知 React 代码如此设计的原因。因此,我觉得好的阅读 React 源码的方式是先整体上把握它的架构和设计理念,而要学习这些,可以先从头手撸一个属于自己的 React 开始。我在网上找到了一篇很好的文章:build your own react, 如果没有科学上网或者英文太长不看的话可以看以下的文章,是在阅读这篇博客时自己对它的简单翻译以及加上了个人的理解,通过以下的阅读,你可以大概了解 React 的三个阶段:调度、协调和渲染,还可以大概了解它的一些函数的作用,如performUnitWork等。麻雀虽小,五脏俱全。这篇文章还涉及到了并发模式、Hooks设计等,对于没有阅读过 React 源码的人很适合~
接下来会通过这几个步骤,依次搭建 React
- Step I: The
createElementFunction - Step II: The
renderFunction - Step III: Concurrent Mode
- Step IV: Fibers
- Step V: Render and Commit Phases
- Step VI: Reconciliation
- Step VII: Function Components
- Step VIII: Hooks
JSX
JSX 是 React 的一种标签语法,形如:
```javascript
const App = () => <div>你好,世界</div>
```
这不是一种有效的JS语法,可以使用类似于 Babel 的编译工具,通过调用 createElement 函数,把标签名字type, 传入参数props还有子节点children,作为 createElement 的入参,转化为有效的 JS 语法。
例如,函数式组件App过 babel 转义后得到以下
```javascript
var App = function App() {
  return /*#__PURE__*/react__WEBPACK_IMPORTED_MODULE_0___default.a.createElement("div", null,     "Text in div ndoe");
};
```
createElement
createElement 通过它传入的参数创建一个 element 对象,还包括对入参做了一些校验。element 是一个包含 type 和 props 的对象,例如 createElement("div", null, [a, b]) 会返回
{
  "type": "div",
  "props": { "children": [a, b] }
}
creatElement的简单实现:
function createElement(type, props, ...children) {
  return {
    type,
    props: {
      ...props,
      children,
    },
  }
}
Children 中可能包含为值为primitive的节点(纯文本),因此需要做下区分
function createElement(type, props, ...children) {
  return {
    type,
    props: {
      ...props,
       children: children.map(child =>
        typeof child === "object"
          ? child
          : createTextElement(child)
      ),
    },
  }
}
function createTextElement(text) {
  return {
    type: "TEXT_ELEMENT",
    props: {
      nodeValue: text,
      children: [],
    },
  }
}
Render 函数
Render 函数是来建立和 Dom 节点的联系的,包括添加节点、更新节点、删除节点。
新增:递归子节点,根据element的类型,如果为文本节点,则调用document.createTextNode, 否则调用document.createElement,然后再把 props 添加到节点属性上。
function render(element, container) {
  const dom =
    element.type == "TEXT_ELEMENT"
      ? document.createTextNode("")
      : document.createElement(element.type);
  const isProperty = key => key !== "children";
  Object.keys(element.props)
    .filter(isProperty)
    .forEach(name => {
      dom[name] = element.props[name];
    });
  element.props.children.forEach(child => render(child, dom));
  container.appendChild(dom);
}
并发 concurrent 模式
如果是单纯的递归调用的话,需要等待整颗 element 树渲染完,可能会造成主线程阻塞太长时间,所以我们需要把前面的这些工作拆分成多个小单元(unit),在每个工作单元结束后,假如浏览器需要执行一些优先级比较高的工作,如保证动画的流畅运行,则中断 react 的渲染,待空闲后再次调起。目前浏览器提供requestIdleCallback API 来把在浏览器的空闲时段内调用的函数排队。React 自己实现了 schedule package, 概念上是一致的。
截至2019年11月,并发模式在React中还不稳定。 循环的稳定版本看起来像这样:
while (nextUnitOfWork) {
  nextUnitOfWork = performUnitOfWork(
    nextUnitOfWork
  )
}
为了让 work Loop 开启,我们需要需要实现 performUnitWork 函数,该函数不仅需要实现 work Loop 还需要返回下一个 work unit
Fiber
Fiber 就是 React 中的虚拟 Dom,fiber 树是用来组织安排工作单元的,每个 element 对应一个 fiber,每个fiber都将会是一个工作单元。在 render 阶段我们会创建一个root fiber 并将其设置为 nextUnitWork,剩下的工作就交给 performUnitWork, 在这里我们需要给每个fiber都做三件事:
- 添加元素到dom
- 为 element 的 chilren 创建 fibers
- 选择 nextUnitOfWork
为了方便实现上边的工作,采用树结构,所以每个fiber 节点都会有指向第一个子节点、父节点、兄弟节点的指针。寻找下一个工作fiber的顺序:子节点 -> 兄弟节点 -> 父节点的兄弟节点(若无,一直向上找直到root)
function createDom(fiber) {
  // 创建真实Dom节点
}
function render(element, container) {
  nextUnitOfWork = {
    dom: container,
    props: {
      children: [element],
    },
  }
}
let nextUnitOfWork = null
function workLoop() {
  // 使用 requestIdleCallback 实现调度
  let shouldYield = false
  while (nextUnitOfWork && !shouldYield) {
    nextUnitOfWork = performUnitOfWork(
      nextUnitOfWork
    )
    shouldYield = deadline.timeRemaining() < 1
  }
  requestIdleCallback(workLoop)
}
function performUnitOfWork(fiber) {
  // add dom node
  if (!fiber.dom) {
    fiber.dom = createDom(fiber)
  }
  if (fiber.parent) {
    fiber.parent.dom.appendChild(fiber.dom)
  }
  // create new fibers
  const elements = fiber.props.children
  let index = 0
  let prevSibling = null

  while (index < elements.length) {
    const element = elements[index]
    const newFiber = {
      type: element.type,
      props: element.props,
      parent: fiber,
      dom: null,
    }
  }

   if (index === 0) {
      fiber.child = newFiber
    } else {
      prevSibling.sibling = newFiber
    }
    prevSibling = newFiber
    index++
  // return next unit of work
  if (fiber.child) {
    return fiber.child
  }
  let nextFiber = fiber
  while (nextFiber) {
    if (nextFiber.sibling) {
      return nextFiber.sibling
    }
    nextFiber = nextFiber.parent
  }
}
render 和 commit 阶段
在上面的处理中,由于浏览器是可以中断 work loop的,所以可能会出现UI不完整的问题,因此需要把对 DOM 结构的改变增加一个commit阶段。所以我们需要跟踪 fiber tree 的 root,只有当我们知道已经完成了所有的工作(没有 nextUnitWork了),才执行commit,提交整棵 fiber 树到 Dom 结构的变更。
function render(element, container) {
  wipRoot = {
    dom: container,
    props: {
      children: [element],
    },
  }
  nextUnitOfWork = wipRoot
}

let nextUnitOfWork = null
let wipRoot = null

function workLoop() {
  // 使用 requestIdleCallback 实现调度
  let shouldYield = false
  while (nextUnitOfWork && !shouldYield) {
    nextUnitOfWork = performUnitOfWork(
      nextUnitOfWork
    )
    shouldYield = deadline.timeRemaining() < 1
  }
   if (!nextUnitOfWork && wipRoot) {
    commitRoot()
  }
  requestIdleCallback(workLoop)
}

function commitRoot() {
  commitWork(wipRoot.child)
  wipRoot = null
}

function commitWork(fiber) {
  if (!fiber) {
    return
  }
  const domParent = fiber.parent.dom
  domParent.appendChild(fiber.dom)
  commitWork(fiber.child)
  commitWork(fiber.sibling)
}
调和阶段
在上边一直只讲了 dom 节点的添加,下面开始讲更新和删除。
为了判断出节点的下一个状态,我们需要在 render 阶段中比较将收到的 elements 和上一次我们提交到 dom 的 fiber 树做对比。因此要添加一个currentRoot来保存对上一次提交到 dom 的 fiber 树的引用,同时也在每一个 fiber 上添加 alternate 属性,指向上一个旧的 fiber.
上面的 performUnitOfWork 一共做了三步操作:1. 添加元素到dom 2.为 element 的 chilren 创建 fibers 3.选择 nextUnitOfWork。现在要对第二步创建新 fibers 这里的代码做解构,拆分到reconcileChildren函数中, 在这里进行新旧Fiber的比较,打上比较的标签:
(1) 如果类型相同,可以保持 dom 节点,使用新的属性替换;
(2) 如果类型不同并且有新的 element,则需要创建一个新的 dom 节点;
(3) 如果类型不同并存在旧fiber 的话,需要删除
function render(element, container) {
  wipRoot = {
    dom: container,
    props: {
      children: [element],
    },
    alternate: currentRoot,
  }
  deletions = []
  nextUnitOfWork = wipRoot
}

let nextUnitOfWork = null
let currentRoot = null
let wipRoot = null
let deletions = null

// 从上面的 performUnitOfWork 中拆出来
function performUnitOfWork(fiber) {
  // 1. 添加元素到dom
  // 2.为 element 的 chilren 创建 fibers
  const elements = fiber.props.children
  reconcileChildren(fiber, elements)
  // 3.选择 nextUnitOfWork。
}
function reconcileChildren(wipFiber, elements) {
  let index = 0
  let oldFiber = wipFiber.alternate && wipFiber.alternate.child
  let prevSibling = null

  while (index < elements.length || oldFiber != null) {
    const element = elements[index]
    let newFiber = null
    // 进行 oldFiber 和 element 的比较
    const sameType = oldFiber && element && element.type == oldFiber.type
    if (sameType) {
      // update the node
      newFiber = {
        type: oldFiber.type,
        props: element.props,
        dom: oldFiber.dom,
        parent: wipFiber,
        alternate: oldFiber,
        effectTag: "UPDATE",
      }
    }
    if (element && !sameType) {
      // add this node
      newFiber = {
        type: element.type,
        props: element.props,
        dom: null,
        parent: wipFiber,
        alternate: null,
        effectTag: "PLACEMENT",
      }
    }
    if (oldFiber && !sameType) {
      // delete the oldFiber's node
      oldFiber.effectTag = "DELETION"
      deletions.push(oldFiber)
    }
  }

   if (index === 0) {
      fiber.child = newFiber
    } else {
      prevSibling.sibling = newFiber
    }
    prevSibling = newFiber
    index++
}

function commitRoot() {
  deletions.forEach(commitWork)
  commitWork(wipRoot.child)
  currentRoot = wipRoot
  wipRoot = null
}

function commitWork(fiber) {
  if (!fiber) {
    return
  }
  const domParent = fiber.parent.dom
  if (
    fiber.effectTag === "PLACEMENT" &&
    fiber.dom != null
  ) {
    domParent.appendChild(fiber.dom)
  } else if (
    fiber.effectTag === "UPDATE" &&
    fiber.dom != null
  ) {
    updateDom(
      fiber.dom,
      fiber.alternate.props,
      fiber.props
    )
  } else if (fiber.effectTag === "DELETION") {
    domParent.removeChild(fiber.dom)
  }
  domParent.appendChild(fiber.dom)
  commitWork(fiber.child)
  commitWork(fiber.sibling)
}
const isEvent = key => key.startsWith("on")
const isProperty = key =>
  key !== "children" && !isEvent(key)
const isNew = (prev, next) => key =>
  prev[key] !== next[key]
const isGone = (prev, next) => key => !(key in next)
function updateDom() {
  // 删除或者改变事件监听
  // 删除旧的属性
  // 添加新属性
  // 添加新的事件监听
}
函数式组件
function组件和class组件区别在于:
- Functional组件的fiber没有dom节点
- children是通过直接运行函数得到的,而不是通过children属性
在 performUnitOfWork 中判断是否是函数式组件,是的话执行updateFunctionComponent更新,否执行原来的更新方式
const isFunctionComponent = fiber.type instanceof Function
if (isFunctionComponent) {
  updateFunctionComponent(fiber)
} else {
  updateHostComponent(fiber)
}

function updateFunctionComponent(fiber) {
  const children = [fiber.type(fiber.props)]
  reconcileChildren(fiber, children)
}


function updateHostComponent(fiber) {
  if (!fiber.dom) {
    fiber.dom = createDom(fiber)
  }
  reconcileChildren(fiber, fiber.props.children)
}
由于fiber 没有 dom 节点,所以在 commitWork 中也要做两个更改:
domParent 需要一直向上找
let domParentFiber = fiber.parent
while (!domParentFiber.dom) {
  domParentFiber = domParentFiber.parent
}
const domParent = domParentFiber.dom
删除节点的时候也要找到有child是有dom节点的
function commitDeletion(fiber, domParent) {
  if (fiber.dom) {
    domParent.removeChild(fiber.dom)
  } else {
    commitDeletion(fiber.child, domParent)
  }
}
Hooks
为了能在函数式组件中保持状态,我们需要设置一些全局变量: hooks 数组还有当前的 hook index
let wipFiber = null
let hookIndex = null

function updateFunctionComponent(fiber) {
  wipFiber = fiber
  hookIndex = 0
  wipFiber.hooks = []
  const children = [fiber.type(fiber.props)]
  reconcileChildren(fiber, children)
}
useState 中通过 alternate 和 hookIndex 检查是否有旧的 hook,若有,则从旧的 hook 中拷贝 state 到新的 hook 中,如无,则进行hook的初始化
function useState(initial) {
  const oldHook =
    wipFiber.alternate &&
    wipFiber.alternate.hooks &&
    wipFiber.alternate.hooks[hookIndex]
  const hook = {
    state: oldHook ? oldHook.state : initial,
  }
  wipFiber.hooks.push(hook)
  hookIndex++
  return [hook.state]
}
为了实现提供一个实现状态更新的函数,useState 函数还要再返回一个 setState 函数,并在 hook 中添加一个 queue 属性,把调用 setState 的动作推入 queue 数组保存起来,这样,下次会从队列中取出action, 依次执行,更新state
function useState(initial) {
  const oldHook =
    wipFiber.alternate &&
    wipFiber.alternate.hooks &&
    wipFiber.alternate.hooks[hookIndex]
  const hook = {
    state: oldHook ? oldHook.state : initial,
    queue: []
  }

  const actions = oldHook ? oldHook.queue : []
  actions.forEach(action => {
    hook.state = action(hook.state)
  })

  const setState = action => {
    hook.queue.push(action)
    wipRoot = {
      dom: currentRoot.dom,
      props: currentRoot.props,
      alternate: currentRoot,
    }
    nextUnitOfWork = wipRoot
    deletions = []
  }
  wipFiber.hooks.push(hook)
  hookIndex++
  return [hook.state, setState]
}
React 架构
React16架构可以分为三层:
- Scheduler(调度器)—— 调度任务的优先级,高优任务优先进入Reconciler
- Reconciler(协调器)—— 负责找出变化的组件
- Renderer(渲染器)—— 负责将变化的组件渲染到页面上
从以上对React的简单实现大概可以感知这三层是如何实现的,并且应该也清楚了一些基本概念,如虚拟Dom节点对应Fiber,diff算法对应reconcile.
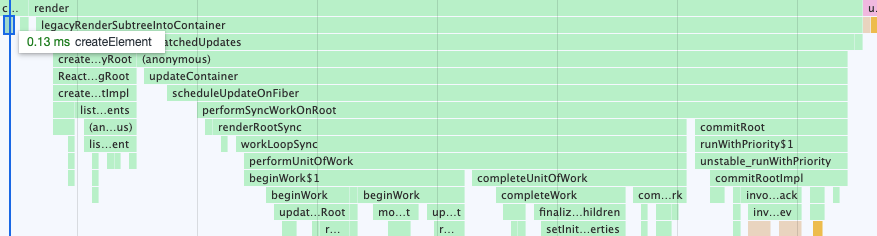
从浏览器中截出React的函数调用栈,可以看到是有明显分出层次的:
下期将会接着从这三层对 React 的源码进行细化分析,学习 React 为保证性能做出的优化。
本文由 ellila 创作,采用 知识共享署名4.0 国际许可协议进行许可
本站文章除注明转载/出处外,均为本站原创或翻译,转载前请务必署名
最后编辑时间为: Mar 26, 2023 at 12:00 am