对于一个UI框架而言,除了构建UI之外,还需要满足两个主要功能,一要响应外部事件,二要处理好各个组件之间的数据同步关系。本文将探究Flutter是怎么处理数据同步关系的。
数据同步关系
数据同步关系有以下三种类型
- 由上往下,传递给子孙节点
- 由下往上,传递给祖宗节点
- 兄弟节点传递
同步可能需要满足以下场景
组件A共享数据给组件B时,
- 组件B可以实时拿到组件A的变化值,
- 可以监听到数据变更,
- 组件B可以通知组件A进行数据更改,
- 组件A可以决定是否需要重建。
Flutter 提供的三种方案:
- InheritedWidget: 适用于父组件传递给子组件的场景, 可跨层级
- Notification:适用于子组件通知父组件数据改变的场景
- Event Bus:事件广播,可适于于各种类型的数据通知同步
其实还有一种状态管理方案: Provider, 适用于复杂应用,可以方便的实现三种类型的数据同步。
InheritedWidget
InheritedWidget适用于父组件传递给子组件的场景, 可跨层级,是一个功能型组件, 意味着它仅提供数据操作的功能,不提供UI构建。
使用方法:
需要提供一个组件用来包装数据,它继承InheritedWidget类,把需要共享的数据和数据改变方法包装进来,并提供一个of方法方便在子widget往上找到这个功能组件。可以重写updateShouldNotify方法,在flutter中判断InheritedWidget是否需要重建,从而通知下层观察者组件更新数据时被调用。
子组件使用.of(context).XXX方法来获得共享的数据,同时可以覆写State对象的didChangeDependencies回调,该回调会在组件所依赖的数据发生变化时调用
下面用计数器的例子来说明InheritedWidget如何使用:
- 封装功能性组件
class CountContainer extends InheritedWidget {
   final _CounterPageState model;
   final Function() increment;

   CountContainer({
     Key key,
     @required this.model,
     @required this.increment,
     @required Widget child,
   }): super(key: key, child: child);

   // of方法
  static CountContainer of(BuildContext context) {
     return context.dependOnInheritedWidgetOfExactType<CountContainer>();
   }

   // 重写udpdateShouldNotify
   @override
   bool updateShouldNotify(CountContainer oldWidget) => model != oldWidget.model;
 }
- 在子组件中取出数据使用并监听何时发生变化
   class Counter extends StatefulWidget {
     @override
     _CounterState createState() => new _CounterState();
   }

   class _CounterState extends State<Counter> {
     @override
     Widget build(BuildContext context) {
       return Text(CountContainer
         .of(context)
         .data
         .toString()
       );
     }
     @override
     void didChangeDependencies() {
       super.didChangeDependencies();
       print("Dependencies change");
     }
   }
- 补充好数据传递关系
   class _InheritedWidgetTestRouteState extends State<InheritedWidgetTestRoute> {
     int count = 0;

     @override
     Widget build(BuildContext context) {
       return Center(
         child: CountContainer(
           data: count,
           child: Column(
             mainAxisAlignment: MainAxisAlignment.center,
             children: <Widget>[
               Padding(
                 padding: const EdgeInsets.only(bottom: 20.0),
                 child: Counter(),
               ),
               RaisedButton(
                 child: Text("Incremnt"),
                 onPressed: () => setState(() => count++),
               )
             ],
           ))
       );
     }
   }
Notification
Notification适用于子组件通知父组件数据改变的场景,是通过dispatch方法将消息由子到父派发出来的,这种机制叫做通知冒泡,会通知到所有通过NotificationListener来监听的父节点,也可以通过中间的某个节点来中止。
Flutter中已经实现了很多类型的通知,比如滑动通知派发ScrollNotification,这些通知都是继承自基类Notifaction, 所以Flutter也支持自定义通知,派发消息给父类。
自定义消息派发
下面展示自定义消息派发的步骤:
- 自定义通知
    //自定义通知
    class CustomNotification extends Notification {
      CustomNotification(this.msg);
      final String msg;
    }
- 在子组件中通过dispatch派发消息
   class CustomChild extends StatelessWidget {
     @override
     Widget build(BuildContext context) {
       return RaisedButton(
         child: Text("Fire Notification"),
         onPressed: () => CustomNotification("lala").dispatch(context),
       );
     }
   }
- 在父组件中通过NotificationListener设置对自定义通知的监听
class CustomNotificationRoute extends StatefulWidget {
     @override
     _CustomNotificationRouteState createState() => new _CustomNotificationRouteState();
   }

   class _CustomNotificationRouteState extends State<CustomNotificationRoute> {
     String _msg = "通知: ";

     @override
     Widget build(BuildContext context) {
       return Scaffold(
         body: NotificationListener<CustomNotification>(
           onNotification: (notification) {
             setState(() {
               _msg += notification.msg + "   ";
             });
           },
           child: Column(
             mainAxisAlignment: MainAxisAlignment.center,
             children: <Widget>[Text(_msg), CustomChild()],
           )
         )
       );
     }
   }
dispatch方法为什么需要传入context?
因为context实际上是操作element的一个接口,它和element树的结构是保持一致的,当通知派发出来后,会从当前的context一直往上找。所以这里如果我们直接把子组件的实现写在父组件的类定义里边的话,父组件是没有办法接收到通知的,因为这个时候dispatch(context)的context是_CustomNotificationRouteState的,位于NotificationListener定义的上层,已经在监听的范围之外了。
class _CustomNotificationRouteState extends State<CustomNotificationRoute> {
   String _msg = "通知: ";

   @override
   Widget build(BuildContext context) {
     return Scaffold(
       body: NotificationListener<CustomNotification>(
         onNotification: (notification) {
           setState(() {
             _msg += notification.msg + "   ";
           });
         },
         child: Column(
           mainAxisAlignment: MainAxisAlignment.center,
           children: <Widget>[
             Text(_msg),
             RaisedButton(
               child: Text("Fire Notification"),
               onPressed: () => CustomNotification("lala").dispatch(context),
             )
           ],
         )
       )
     );
   }
 }
如何停止通知冒泡?
在onNotification函数中返回true即可。默认情况下onNotification返回false表示不阻止冒泡
Event Bus
事件总线,是一种广播机制,遵循发布-订阅关系,发布者和订阅者之间不需要有父子关系。在应用不需要大量的共享数据时,可以使用Event Bus来共享状态。
使用 event_bus
第三方插件event_bus提供了单例模式的事件总线,在pubspec.yaml中添加依赖:event_bus: 1.1.0, 下面提供如何使用event_bus的示例步骤:
自定义事件类型和全局事件总线
class CustomEvent {
  String msg;
  CustomEvent(this.msg);
}
EventBus eventBus = new EventBus(); // 全局事件总线
添加事件订阅者对事件进行监听
class EventBusRoute extends StatefulWidget {
  @override
  _EventBusRouteState createState() => new _EventBusRouteState();
}

class _EventBusRouteState extends State<EventBusRoute> {
  String msg = '通知:';
  StreamSubscription subscription;

  @override
  void initState() {
    // State初始化时,添加订阅者
    // 使用setState刷新UI
    subscription = eventBus.on<CustomEvent>().listen((event){
      print(event);
      setState(() {
        msg += event.msg;
      });
    });
    super.initState();
  }

  dispose() {
    subscription.cancel();//State销毁时,清理注册
    super.dispose();
  }

  @override
  Widget build(BuildContext context) {
    return Scaffold(
      appBar: AppBar(title: Text("First Page")),
      body: Text(msg),
      floatingActionButton: FloatingActionButton(
        child: Text("Jump"),
        onPressed: () => Navigator.push(context, MaterialPageRoute(builder: (context) => SecondPage()))),
    );
  }
}
- 派发事件
class SecondPage extends StatelessWidget {
  @override
  Widget build(BuildContext context) {
    return Scaffold(
      appBar: AppBar(title: Text("Second Page")),
      floatingActionButton: FloatingActionButton(
        child: Text("Fire"),
        onPressed: () => eventBus.fire(CustomEvent("Hello"))),//派发事件
    );
  }
}
Event Bus还可以使用单例模式来包装一下,这样子可以达到一次创建,处处可用的目的。
Flutter的单例模式实现
什么是单例模式?
单例模式提供了一种创建对象的方式,该模式下涉及到单一的一个类,该类负责创建自己的对象,同时确保只有一个对象被创建,并需要提供访问其唯一对象的方法。当我们需要在项目中保持对象的一致性,或者是对象初始化时需要耗费比较多的资源,或者是希望只创建一次,就可以到处使用的时候,我们应该使用单例模式来实现。
Flutter提供了factory关键字
factory构造函数比一般的构造函数限制要更加轻松,只需要返回同类型的类的实例即可(对于接口而言,只要实现了方法就好),也就是说factory构造函数可以返回一个新的对象,也可以返回一个已创建的对象,这就需要我们使用控制流来控制返回值。
单例模式的EventBus
   class GlobalEventBus{
     EventBus event;
     factory GlobalEventBus() => _getInstance();//工厂构造函数
     static GlobalEventBus get instance => _getInstance();
     static GlobalEventBus _instance;

     GlobalEventBus._internal() {
       // 私有构造函数,实现创建对象的具体过程
       event = EventBus();
     }
     // 提供公有访问方法
     static GlobalEventBus _getInstance() {
       if (_instance == null) {
         _instance = GlobalEventBus._internal();
       }
       return _instance;
     }
   }
这样封装之后就不需要再保留一个eventBus对象了,而是可以直接使用GlobalEventBus().event来获得事件总线。
状态管理--Provider
当项目的数据流动关系比较简单的时候,以上三种数据传递的方案已经足够了,但是随着项目日益庞大,数据在不同的页面、组件之间需要频繁共享的时候,我们如果在页面中频繁的建立Notificationh或者StreamSubscription来监听的话,会多出很多功能性组件使得代码冗长,数据不好管理,我们需要可以更加灵活的处理数据共享问题,类似在项目中建立好前端的数据库。而Provider是Flutter官方在Google I/O 2019大会上推荐使用的一种状态管理方式,它提供了依赖注入,预先把数据放到某个我们都可以访问到的地方,当需要的时候再去从中取出来。-
类型
Peovider有两种类型:
- Provider,如果需要接收数据变化的话用ChangeNotifierProvider
- MultiProvider, 适用于有多个数据状态需要共享的情况
使用步骤
Provider的使用步骤也很清晰:
- 封装数据模型(封装好数据+改变的方法)
- 添加数据依赖,放置好Provider的位置
- 使用数据,有两种使用方法
- of
- consumer
计数器示例
还是以计数器为例,下面展示Provider的用法:
// 封装数据模型
    class CounterModel with ChangeNotifier {
      int _count = 0;
      int get count => _count;
      void increment() {
        _count++;
        notifyListeners();
      }
    }
    class MyApp extends StatelessWidget {
      @override
      Widget build(BuildContext context) {
        // ChangeNotifierProvider注入,放在顶层,Provider其实是InheritedWidget的语法糖,它也是一个Widget
        return ChangeNotifierProvider.value(
          value: CounterModel(),// 添加数据依赖
          child: MaterialApp(
            title: 'Flutter Provider',
            theme: ThemeData(
              primarySwatch: Colors.blue,
            ),
            home: MyHomePage(),
          ),
        );
      }
    }
    // 使用Provider可以很方便地在两个页面之间传递数据
    class MyHomePage extends StatelessWidget {
      @override
      Widget build(BuildContext context) {
        final _counter = Provider.of<CounterModel>(context);//of方法取出数据
        return Scaffold(
          appBar: AppBar(title: Text("First Page"),),
          body: Text("Counter: ${_counter.count}"),
          floatingActionButton: FloatingActionButton(
            child: Text("Jump"),
            onPressed: () => Navigator.push(context, MaterialPageRoute(builder: (context) => SecondPage())),
          ),
        );
      }
    }

    class SecondPage extends StatelessWidget {
      @override
      Widget build(BuildContext context) {
        final _counter = Provider.of<CounterModel>(context);
        return Scaffold(
          appBar: AppBar(title: Text("Second Page"),),
          body: Text("Second Page: ${_counter.count}"),
          floatingActionButton: FloatingActionButton(
            onPressed: _counter.increment,
            child: Icon(Icons.add),
          ),
        );
      }
    }
of和consumer的区别
使用of方法的话,子组件即使不依赖于取出的数据,也会在数据发生改变时销毁重建,但是consumer只会刷新依赖数据的那些组件。
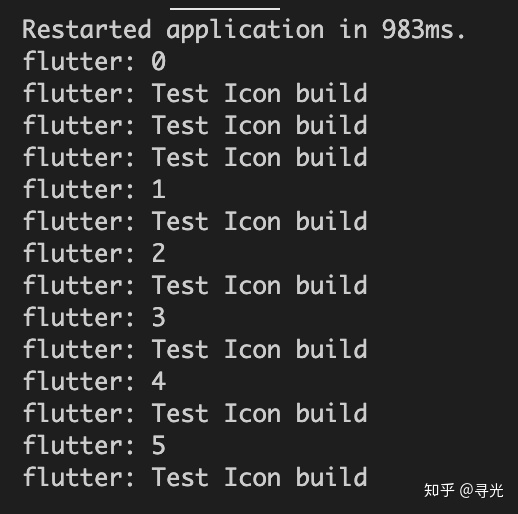
以上边的计数器例子中的SecondPage为例,我们把没有依赖的数据的图标组件的创建次数打印出来
class SecondPage extends StatelessWidget {
      @override
      Widget build(BuildContext context) {
        final _counter = Provider.of<CounterModel>(context);
        return Scaffold(
          appBar: AppBar(title: Text("Second Page"),),
          body: Text("Second Page: ${_counter.count}"),
          floatingActionButton: FloatingActionButton(
            onPressed: _counter.increment,
            child: TestIcon(),
          ),
        );
      }
    }

    class TestIcon extends StatelessWidget {
      @override
      Widget build(BuildContext context) {
        print("Test Button build");
        return Icon(Icons.add);
      }
    }
打印出来如下,每次数据一发生变化,Icon组件都会重建-
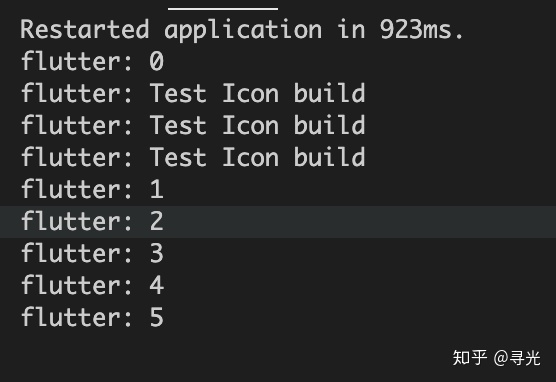
使用Concumer来改造获得组件的方式,直接使用Consumer功能组件把UI组件包起来, Consumer, T指定model类型,其builder函数接收三个参数: context, model,child
class SecondPage extends StatelessWidget {
      @override
      Widget build(BuildContext context) {
        return Scaffold(
          appBar: AppBar(title: Text("Second Page"),),
          body: Consumer<CounterModel>(
            builder: (context, CounterModel counter, _) {
              print(counter.count);
              return Text("Second Page: ${counter.count}");
            }
          ),
          floatingActionButton: Consumer<CounterModel>(
            builder: (context, CounterModel counter, child) =>  FloatingActionButton(
              onPressed: counter.increment,
              child: child,
            ),
            child: TestIcon(),
          )
        );
      }
    }
改造后打印结果:-
MultiProvider
至于 MultiProvider 的使用也很简单,还是按照这三个步骤进行
- 封装数据模型(封装好数据+改变的方法)
- 添加数据依赖,放置好Provider的位置
- 使用数据,有两种使用方法
- of
- consumer
现在把计数器示例改造一下,除了传递计数,还需要传递页面字体大小-
第2步的添加数据依赖需要使用MultiProvider
class MyApp extends StatelessWidget {
      @override
      Widget build(BuildContext context) {
        return MultiProvider(
          providers: [
            Provider.value(value: 30.0), //注入字体大小
            ChangeNotifierProvider.value(value: CounterModel())
          ],
          child: MaterialApp(
            title: 'Flutter Provider',
            theme: ThemeData(
              primarySwatch: Colors.blue,
            ),
            home: MyHomePage(),
          ),
        );
      }
    }
第3步的取出数据,如果需要同时取出两个数据的话,要使用Consumer2拓展
class SecondPage extends StatelessWidget {
      @override
      Widget build(BuildContext context) {
        return Scaffold(
          appBar: AppBar(title: Text("Second Page"),),
          body: Consumer2<CounterModel, double>(
            builder: (context, CounterModel counter, double textSize,  _) {
              print(counter.count);
              return Text("Second Page: ${counter.count}", style: TextStyle(fontSize: textSize),);
            }
          ),
          floatingActionButton: Consumer<CounterModel>(
            builder: (context, CounterModel counter, child) =>  FloatingActionButton(
              onPressed: counter.increment,
              child: child,
            ),
            child: TestIcon(),
          )
        );
      }
    }
这里同时取出两个数据是用到Consumer2, 同时取出3个则是用Consumer3....-
美中不足的是官方只拓展到了Consumer6,也就是说最多只可以一次同时取出6个数据
本文由 ellila 创作,采用 知识共享署名4.0 国际许可协议进行许可
本站文章除注明转载/出处外,均为本站原创或翻译,转载前请务必署名
最后编辑时间为: Mar 26, 2023 at 12:23 am